Pages

Tuesday, July 16, 2013

Alan & Karen Clay Wedding Topper

This topper was created for Alan and Karen (my partners sister). Karen has a Rough Collie so I wanted to add him onto the model.


Sorry I did not take the photographs as I created this topper but I was pretty pleased with the way it worked especially Brett.
 
Hope you like it.


Lisa & Ian & a Harley Davidson

This clay topper was created for Ian and Lisa who got married on 13th April 2013.
 
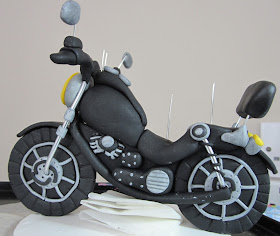
They wanted to be sat on their Harley Davidson in their biking gear with their pet Parrot on the tank.
 
I started with the bike. The wheels and handlebars.
 
 
I then added the detail to the bike.

 
Next the legs. I wanted Ian's legs to be either side of the bike to add to the stability of the figures.

 
Next the bodies and heads and finer details.


The parrot I decided would be stronger if it was fitted to the tank. I put two wires into the tank and built the parrot around it.


The club badge was done using a decal, it worked very well. The hardest part was the lettering on the bike.
 

You could not read the badge on the jumpers very clearly so I did a larger one for the base.


The names were placed on a thin piece of clay and added to the front of the model.

 
and here we are all suited and booted, wheels polished for the big day.
 
Thanks for looking, please feel free to leave any comments.


Charlotte & Simon Wedding Cake Topper

This clay wedding cake topper was created to sit on the top of the wedding cake for the marriage of Charlotte and Simon who got married on 1st September 2012.


As always I started with the groom, a nice pair of black shoes and his grey morning suit.


Here we have him all kitted out in his suit waiting for the hairdresser to work her magic.


Groom completed, eyes, hair and his glasses. His shoes are all polished and his handkerchief is in his top pocket.


Now for the bride.


Her dress is ivory with lots of detail on the bodice and down the sides. A lot of the detail of the dress would have been lost as the couple were sitting on the cake, so I brought the back of the dress around to the side to show some of the frills and the stitching.


The bouquet is a mixture of Ivory and Lemon Calla Lilies and lime green Orchids.


Here we have the bride with her hair freshly styled and her tiara and veil in place.


Bride completed, all the detail is now on the front and sides of the dress.


The happy couple waiting for their big day.


A photograph of their big day sitting in all their splendour, what a fantastic cake.


A big thank you to Charlotte's Mum for sending me the photograph.


Please feel free to leave any comments.

Thank you.


Adam & Dannii Wedding Cake Topper

This clay wedding cake topper has been created for Adam and Dannii who got married on the 21 July 2012.
 

Adam is wearing a Morning suit and I started as usual by making his legs and shoes.
 

The next step is to dress him in his shirt, waistcoat and cravat.


His Morning suit is mid grey, his waistcoat ivory and cravat a sort of Cadbury purple and no jacket is complete without the matching clean handkerchief.


He still needs his left hand but at this point I had not decided what he was going to do with it! sounds ominous.


The bride now has her bouquet and has just visited the hairdressers. The detail has been added to her dress and the grooms left hand has been added to enable the bride to link arms with him. Next the veil and eyes to see with.
 

The names and date have been added to the base along with some of the flowers from the bouquet.


The veil has been added to the hair by placing it under the detail at the back of the head.
 

All finished, shoes polished, eyes shining and all ready for the big day.


I hope you like this specially created clay wedding cake topper.


Please feel free to leave any comments.


DIY Wedding Photo Canvas

I thought you may like to take a look at these photo canvases I have just made. I can't claim it was my idea and you can find links to the steps all over the internet but if you would like to keep reading I can let you into this fool proof method.

All you need is:


canvas

a photograph that is near enough the size of the canvas

acrylic paint

either a sponge brush or a 1" - 2" paint brush

scrapbook paper

Mod Podge

Begin by cutting the scrapbook paper into strips slightly smaller than the sides of the canvas.
Mod Podge around the edges of the canvas and wait a few seconds for it to go slightly tacky, stick this all around the sides as in the photograph below.

Cut your photograph just smaller than the canvas and Mod Podge the back of it not the canvas. Try not to get the Mod Podge on the photograph it can smudge the colour, I used my inkjet printer for the photograph and it worked fine.


Gently press the photograph onto the canvas, I found the best way was to line up the photograph then lay a piece of greaseproof paper on top and gently smooth it down.

Once dry, it only takes about 30 minutes you can Mod Podge the front of the photograph. I prefer the brush to do this. For the first coat go down vertically one way making sure it is all coated, when this is dry you can do the second coat vertically. This will give the effect of linen on your photograph.

The Mod Podge will be a milky white when first done but dries clear.


It really is very easy and I was pleased with the result, I may have to get more of these and get creating.

You can buy these canvases at various shops and they are very cheap. These had the easels with them which I covered in ginger alcohol ink and then a coat of water based varnish.


This is the photograph with the first coat.


This is the first coat when nearly dry.


You can see the difference in the wet and dry here.

When both coats are dry you can apply the acrylic paint, the choice of colour is entirely yours.

I used a small stipple brush lightly loaded with the paint, don't use too much better to add the paint sparingly and get the colour right than try and take it off!


This first photograph was smaller than the canvas so it has a bigger border you can see the difference between them, the second photograph was larger hence the smaller border.


I added the corners and small flowers just as embellishments. I am rather pleased with both of them.

and then of course I had to do some of our Bert.


Hope you like them.


Peter & Hazel Wedding Cake Topper

This topper was commissioned by a proud Mum for her daughter Hazel who married Peter on the 9th August 2012.

Peter is a keen runner and proposed to Hazel after he had run a marathon and Hazel is a enthusiastic cyclist. They wanted this to be reflected in their topper and also some movement needed to be captured. I did this by making Hazel's hair 'blow in the wind' as if she was riding her bike at speed and Peter running by the side of her bike. We put his marathon number on his back 1312.

Here are some of the steps I took to creating this hand crafted and unique clay wedding cake topper. Because of the nature of the topper wire had to be used to keep the shape and to prevent any mishaps from occurring.
Hazel's bike, two prongs stick up from the saddle to anchor the bride in place. Ouch!


The cat and the bouquet sit in the basket at the front of the bike. The strips of clay were woven together to create the basket.


The brides hair was built over a wire frame to hold it in place


The groom is next running along side the bike.


The Groom has the number he was given when he ran a marathon 1312.


Here we have the happy couple ready to ride and run into the sunset after the ceremony.
 

Hope you like it, please feel free to drop by my blog at any time and leave any comments.

And finally a photograph of the topper in action.

Hope you like it, please feel free to leave any comments.